Home › Guides › Weathering for Beginners
Weathering for Beginners: Washes, Dust, Rust and Mud
BuildAnArmy is reader-supported. When you buy through our Amazon links we may earn a commission, at no extra cost to you. How this works.
Weathering is the art of making a model look used: faded by sun, stained by rain, covered in dust and scarred by use. It is what turns a clean replica into a convincing miniature of a real machine. It is also easy to overdo. This guide covers the core techniques in the order you would use them, and then the most important skill of all: knowing how much is right for a tank, an aircraft or a ship.
Before you start
Weathering goes on top of a finished paint job and decals. Two things make it much easier:
- A gloss coat underneath. Washes and filters flow better and wipe off cleanly on gloss. On matte paint, they soak in and stain.
- Different paint types for different layers. Most beginners paint with acrylics, then weather with enamels or oil paints. Their thinners do not dissolve the acrylic layers under them (especially with a gloss coat in between), so you can wipe away mistakes without damaging the base paint.
Look at photos of the real vehicle in its setting. Weathering is about observation. Where does mud collect? Where do crews walk? Where does rain run off? The answers vary with the season, terrain and type of vehicle.
Panel line wash
A panel line wash is the first and most useful weathering step. It is a thin, dark paint that flows into recessed panel lines, around rivets and bolts, and into corners. It adds depth and makes molded detail stand out.
Touch the tip of a brush loaded with wash to a panel line. The wash flows along it by capillary action. After a few minutes, wipe away any excess with a brush or cotton swab dampened with the right thinner, wiping in the direction of airflow on aircraft or downward on vertical surfaces.
On light colors, such as aircraft undersides or desert schemes, a pure black wash can look harsh. Use a dark brown or grey instead.

Tamiya Panel Line Accent Color, Black
A pre-thinned enamel wash with a brush built into the cap. It flows into panel lines and around detail on its own, and excess wipes off with enamel thinner. A good first weathering product.
Check price on AmazonFilters
A filter is a very thin layer of color brushed over a whole area to subtly shift its tone. It is much thinner than a wash, almost transparent. Filters are used to unify a camouflage scheme, to add variety, or to suggest fading.
A filter can be made from oil paint thinned heavily with odorless thinner, or from a heavily thinned enamel. Apply it with a wide, soft brush, a panel at a time, and let it dry. A light yellow filter over dark yellow can add warmth. A blue-grey filter over olive drab can suggest sun fading. You can apply different filters to different panels for a subtle mottled look that suggests repairs and uneven fading.
Tip: If you can see clear pigment in your filter, it is too thick. The color should barely change in each application. Build up gradually.
Dry-brushing
Dry-brushing highlights raised edges. Use a lighter shade of the base color on an old flat brush. Dip it in paint, then wipe almost all of it off on a paper towel. Flick the brush lightly over raised details. Paint catches only on the high points.
Dry-brushing is especially effective on tank tracks, engine decks, cast textures and figures. Use it sparingly on aircraft, where it can make panel edges look chalky. Metallic dry-brushing, with steel or graphite, is excellent for worn edges on tracks and tools.
Pigments and weathering powders
Pigments are dry powders in earth, rust and soot colors. You can apply them dry with a soft brush for a dusty look, or mix them with thinner to make a paste for mud. Pigments settle into recesses naturally and are easy to blend.
Weathering compacts, such as Tamiya's Weathering Master sets, are pigments pressed into a makeup-style case with a sponge and brush. You rub the color onto the model. They are clean and quick and work well for beginners.

Tamiya Weathering Master Set A: Sand, Light Sand, Mud
Sand, light sand and mud in one compact. Use the light colors for dust on hulls and upper surfaces, and the mud color on running gear and lower hulls. The sponge applicator makes it hard to overdo.
Check price on Amazon
Tamiya Weathering Master Set B: Snow, Soot, Rust
A second set with soot for exhausts and gun muzzles, rust for exhaust pipes and tools, and snow for winter scenes. Together with Set A, it covers almost every common weathering effect on armor.
Check price on AmazonApply pigments after your final matte coat. Spraying varnish over them makes them almost disappear.
Rust
Rust appears on unpainted steel parts, on exhaust systems, and where paint has worn away. On military vehicles, it is common on tow cables, tools, track links, mufflers and spare track carried on the hull.
- Rust base: paint the part in a dark orange-brown, then dab lighter orange and dark brown in patches.
- Rust streaks: touch a little rust-colored enamel or oil paint below a bolt or edge, then pull it downward with a damp brush. On ships, rust streaks run down from hawse pipes, drains and scuppers.
- Exhausts: German tank mufflers, for example, often appear heavily rusted in period photos, because heat burned off the paint.
Mud and dust
Mud collects on the lower hull, running gear and fenders. Mix pigment with a little thinner or a pigment fixer, add a pinch of fine sand for texture, and stipple it on with an old brush. Build it up thicker near the tracks and lighter higher up.
Dust settles everywhere, but more on horizontal surfaces. Brush light dust pigment over the lower hull, fenders and upper surfaces, then remove some with a clean brush where crews would brush it off: hatches, the turret roof, and grab handles.
Match the color to the terrain. Eastern Front mud in spring was dark and wet. Summer dust in Normandy was light. North Africa was sandy and pale. The Pacific islands often meant darker volcanic soil or coral sand.
Exhaust soot and gun stains
Exhaust soot builds up around tank exhaust outlets and on the surfaces behind them. On aircraft, exhaust stains stream back from the exhaust stacks along the fuselage. Apply black or dark grey soot pigment with a soft brush, or airbrush a very thin dark grey mist. On aircraft, the stain follows airflow and gets lighter and wider as it moves back. Gun muzzles and machine gun ports also show soot.

Tamiya Tiger I Early Production

Tamiya P-51D Mustang, 8th Air Force
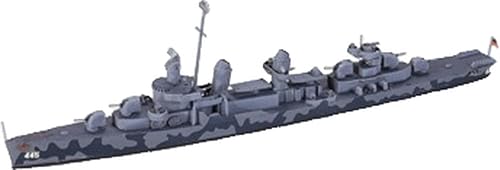
Tamiya USS Fletcher DD-445
A simple first recipe for a tank
If all of this feels like a lot, start with just four steps on your next tank. Together they give most of the effect with very little risk:
- Gloss coat, then a dark pin wash around every bolt, hatch and weld seam.
- A light dry-brush of a paler base color over raised edges.
- A matte coat over the whole model.
- Light dust pigment on the lower hull and mud on the running gear, plus soot at the exhaust.
Add filters, chips and rust streaks on the next build, once these four feel comfortable.
How much is too much?
This is the question every modeler asks. The answer depends on the subject.
| Subject | Typical weathering | What to focus on |
|---|---|---|
| Tanks and armor | Medium to heavy | Mud on running gear, dust on hull, chips on edges, rust on exhausts and tools |
| Soft-skin vehicles (jeeps, trucks) | Light to medium | Dust, mud on wheels, worn seats and floor |
| Aircraft | Light | Panel line wash, exhaust stains, some paint wear at wing roots and access panels |
| Ships | Very light, scale-dependent | Subtle streaks from drains and anchors, hull fading, waterline grime |
Tanks
Tanks in the field were rarely clean. They lived in mud, dust and snow, and crews had little time to maintain the paint. Heavy weathering is often realistic. But consider the story. A brand-new Tiger arriving at a unit should look fresh. A Sherman after weeks in Normandy should look worn.
Aircraft
Aircraft were maintained more carefully, and the airflow kept much of the surface clean. Most WWII fighters show exhaust stains, oil streaks on the lower fuselage and paint wear where crews walked on the wings. There are exceptions: late-war Japanese Navy fighters often show heavy paint loss in period photos, while freshly delivered aircraft were nearly pristine.
Ships
Ships need the lightest touch, because the scale is so small. At 1/700, a Fletcher-class destroyer is only about 16 cm long, and heavy rust streaks look out of scale. A thin panel line wash, a few subtle streaks and a slight lightening of the overall colors are often enough. Larger scales such as 1/350 can take a little more.
Tip: Stop before you think you are done. Take a break, look at the model the next day, and add more only if it needs it. Removing weathering is much harder than adding it.
For the full painting sequence that comes before weathering, see how to paint a model tank.
Quick answers
Do I need an airbrush for weathering?
No. Most weathering techniques, including washes, filters, dry-brushing and pigments, are done with a brush. An airbrush helps with soft exhaust stains and dust, but it is optional.
Should I weather before or after the matte coat?
Washes and filters go on before the matte coat, usually over gloss. Pigments go on after the matte coat, because varnish makes them disappear.
What is the difference between a wash and a filter?
A wash is dark and goes into recesses to create shadows. A filter is much thinner and goes over a whole area to subtly change its color.
How do I fix weathering I do not like?
Enamel and oil washes can be removed with their thinner, as long as there is a gloss coat underneath. Pigments can be brushed or washed off with water before they are fixed.
Keep reading
 Techniques
How to Paint a Model Tank, Step by Step
The order of work for painting a model tank: primer, base coat, camouflage by brush or airbrush, decals, wash, dry-brushing, chipping, tracks and…
Read guide Techniques
How to Apply Model Decals Without Silvering
Make decals look painted on: gloss coat, soaking, Micro Set, Micro Sol and Mark Fit setting solutions, fixing silvering and wrinkles, and sealing the…
Read guide Techniques
Airbrush Basics for Model Builders
Airbrush basics for modelers: brush vs spray can vs airbrush, single vs dual action, compressors, thinning, cleaning, safety and your first practice…
Read guide