Home › Guides › First Model Kit: Tools, Glue & Paint
How to Build Your First Plastic Model Kit: Tools, Glue and Paint
BuildAnArmy is reader-supported. When you buy through our Amazon links we may earn a commission, at no extra cost to you. How this works.
A plastic model kit arrives as grey parts on frames, a sheet of decals and an instruction booklet. Glue, paint and tools are not in the box, and that surprises a lot of first-time builders. The good news: you only need a handful of inexpensive tools to get a clean result, and most of them last for years.
What is actually in the box
Injection-molded kits come with parts attached to plastic frames called sprues (or runners). Each part has a number molded next to it, and the instructions tell you which numbered parts go together in each step. You also get water-slide decals for markings and insignia. Some kits include a few extras like clear parts for windows and canopies, metal parts or poly caps that let wheels and turrets turn.
What you will not find: cement, paint, brushes or tools. That is normal for every major brand, including Tamiya, Revell, Academy and Trumpeter. Block sets such as COBI, die-cast kits such as Goat Guns, and the RC models in our catalog are different: they need nothing extra.
The six tools that matter
You can spend a fortune on hobby tools, but a beginner needs only six things to build well.
- Sprue cutters (side cutters). These snip parts cleanly off the frame. Twisting parts off by hand leaves gouges, and scissors crush the plastic. This is the single most important tool.
- A hobby knife. Used to shave away the small nub left where a part was attached, and to clean up thin lines of excess plastic (called flash or mold seams).
- Sanding sticks or sponges. To smooth the spot where you cut and trimmed. Start with a medium grit (around 400) and finish with a fine one (1000 or higher).
- Plastic cement. Glue that actually melts the plastic surfaces together. More on which type below.
- Tweezers. For small parts, decals and anything your fingers cannot hold.
- A cutting mat. Protects the table and keeps your knife blade sharp longer.

Tamiya Sharp Pointed Side Cutter
A flat-backed cutter that leaves a clean, almost flush cut, so you spend far less time sanding. It is one of the most widely used cutters in the hobby and lasts for years with normal use on plastic. Do not use it on metal wire.
Check price on Amazon
stedi Ultra-Thin Model Nippers
If you are not sure the hobby will stick, an inexpensive thin-blade nipper does most of what the premium cutters do. It is a sensible first purchase and stays useful as a backup later.
Check price on Amazon
X-ACTO #1 Precision Hobby Knife
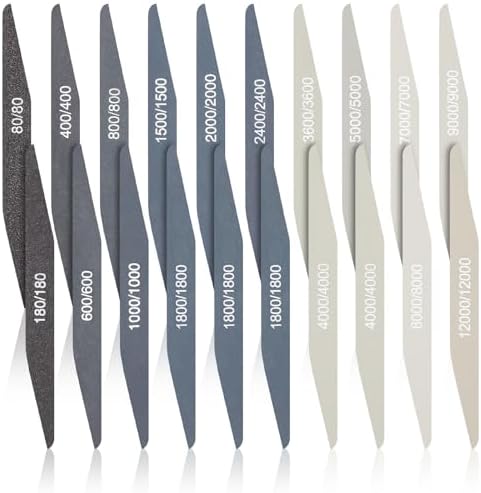
Honoson Sanding Sticks, 20 Pack

Tamiya HG Angled Tweezers

Dahle Self-Healing Cutting Mat, 9 x 12 in
Which glue to buy
Model builders use plastic cement, not superglue or craft glue. Cement softens the two plastic surfaces so they fuse into one piece. There are two kinds you will see:
- Thin (liquid) cement comes in a bottle with a brush in the cap. You hold two parts together and touch the brush to the seam; capillary action pulls the cement into the joint. It is clean, precise and the favorite of most experienced builders.
- Thick (tube) cement is applied to one part before you press it to the other. It gives you more time to position parts, but it is easy to use too much and leave marks.
For a first kit, a bottle of extra-thin cement is the safest choice. Use superglue (CA) only for metal or resin parts, and white craft glue or a canopy glue for clear parts, because cement can fog clear plastic.

Tamiya Extra Thin Cement, 40 ml
Extra-thin cement is the standard choice for plastic kits. The brush applicator lets you run a tiny amount into a seam with almost no mess, and joints set quickly. One bottle lasts through several kits.
Check price on Amazon
Revell Contacta Clear Glue with Needle Applicator
A thicker cement with a fine needle applicator. It gives you a little more working time and the needle makes it hard to flood a part, which helps on your first build.
Check price on AmazonHow to build: a simple order of work
- Read the whole instruction booklet first. Note which steps involve parts you need to paint before assembly, such as a cockpit or tank interior that gets closed up later.
- Wash the sprues in warm, soapy water and let them dry. This removes mold-release residue that can stop paint from sticking.
- Cut parts only when you need them. Leave a little nub on the part, then trim it flush with the knife and sand it smooth.
- Dry-fit before gluing. Hold the parts together without cement to check the fit. Fix any gaps now, not after the glue sets.
- Glue sparingly. Too much cement melts details and squeezes out of the seam. Thin cement only needs a touch.
- Fill and sand seams where needed with a little plastic putty, then sand once it dries.
Tip: Build in sub-assemblies (hull, turret, wheels and tracks for a tank; fuselage, wings, landing gear for a plane) and paint them separately before the final assembly. It is much easier to paint a part you can hold.
Priming and painting
Primer is a thin base coat that helps paint grip the plastic and shows up flaws you missed. A light grey primer works under most military colors; black primer is great under dark schemes and metallic finishes. Spray in light coats from about 20 cm away, in a ventilated space.
For the colors themselves, most builders today use acrylic paints. They are water-based, low in odor and clean up with water. You can brush them or thin them for an airbrush. Buying a themed set (for example WWII German or WWII Allied colors) is the cheapest way to get the exact shades a kit calls for.

Tamiya Fine Surface Primer Spray, Light Gray

Vallejo Surface Primer, Black, 60 ml

Vallejo WWII German Infantry Paint Set

Vallejo Model Air WWII Allied Colors, 16 Bottles

Golden Maple Detail Paint Brush Set, 10 Brushes
Brush painting is perfectly fine for a first model. Use thin coats, let each one dry, and apply two or three rather than one thick coat. If you get serious about the hobby, an airbrush gives smoother camouflage and finishes, but it is not needed to start.

Master Airbrush Cool Runner II Airbrush Kit with Compressor
A complete starter kit with a dual-action airbrush and a small compressor. It is a popular way into airbrushing without spending on separate premium parts.
Check price on AmazonDecals and weathering
Decals are soaked in water for a few seconds, slid off the backing paper onto the model, then blotted dry. Brush a gloss coat on the area first and they will look painted on instead of sitting on a matte surface. A decal setting solution helps them settle over panel lines and rivets.
Weathering is the last step: dust, mud, rust, exhaust stains and a dark wash in the panel lines. A panel line accent color is the easiest way to make details pop, and dry pigment sets add dust and mud with a soft applicator.

Microscale Micro Sol & Micro Set Decal Solutions

Tamiya Panel Line Accent Color, Black

Tamiya Weathering Master Set A: Sand, Light Sand, Mud

Tamiya Weathering Master Set B: Snow, Soot, Rust
Choosing your first kit
Pick a subject you care about, in a scale that is easy to handle, from a brand known for good fit. For tanks, a 1/35 or 1/48 Tamiya kit is a classic first build; for aircraft, a 1/48 single-engine fighter is the sweet spot. Avoid very large ships and big multi-engine bombers until you have a few builds behind you.

Tamiya Tiger I Early Production

Tamiya Willys MB Jeep

Tamiya P-51D Mustang, 8th Air Force

Tamiya M4A3E8 Sherman Easy Eight
Ready to choose? Our guides to the best WWII tank kits for beginners and the best WWII fighter plane kits go deeper, and you can browse every tool we list on the Tools & Paint page.
Go deeper:
Quick answers
Do model kits come with glue?
No. Almost every plastic model kit is sold without glue or paint. Budget for cement, a sprue cutter and a hobby knife at minimum.
Can I build a kit without painting it?
Yes. Many people build their first kit unpainted, or paint only a few details. Some modern kits are molded in color. A painted model looks far better, though, and paint also hides small glue marks.
Acrylic or enamel paint?
Start with acrylics. They are easier to clean up, safer indoors and widely available in military color sets. Enamels are still popular for washes and some effects.
How long does a first kit take?
Plan on several evenings for a typical 1/35 tank or 1/48 fighter, including drying time for paint. Rushing is the most common reason first builds go wrong.
Keep reading
 Tanks
The Best WWII Tank Model Kits for Beginners
The WWII tank model kits that build cleanly and look great for a first or second build: Tiger I, Panther, Sherman, T-34 and more, plus what to know…
Read guide Aircraft
The Best WWII Fighter Plane Model Kits
The best WWII fighter aircraft model kits in 1/32, 1/48 and 1/72: P-51 Mustang, Spitfire, Bf 109, Fw 190, Zero, Corsair and Thunderbolt, with tips…
Read guide Basics
Model Kit Scales Explained: 1/35, 1/48, 1/72, 1/350 and 1/700
What 1/35, 1/48, 1/72, 1/350 and 1/700 mean, how big each model actually ends up, and which scale to choose for tanks, aircraft and…
Read guide