Home › Guides › Your First Military Diorama
How to Build Your First Military Diorama
BuildAnArmy is reader-supported. When you buy through our Amazon links we may earn a commission, at no extra cost to you. How this works.
A diorama puts a model in its world. A tank on a shelf is a replica. The same tank on a muddy road with a crew refueling it from jerry cans is a scene from history. Dioramas can be as large as a whole village or as small as a single figure on a coaster-sized base. This guide shows you how to plan and build your first one, step by step.
Diorama or vignette?
A diorama is a scene with one or more vehicles, figures and terrain. A vignette is a small scene, often with just one or two figures or a single small vehicle, on a compact base. Vignettes are a great first project. They take less time, need fewer materials, and teach you every basic skill: groundwork, figure painting, composition and storytelling.
For a first project, choose one vehicle and two to four figures, or a vignette with a single figure group and a few accessories.
Choosing a base
The base sets the size and the frame of your scene. Options include:
- Wooden plaques: sold in craft stores, often with routed edges. They look finished and are easy to work with.
- Picture frames: a deep frame turned face-up can make an attractive base.
- Foam board or MDF: lightweight and cheap; cover the edges with wood veneer or paint.
Keep the base just large enough for your scene. A common mistake is choosing a base that is too big, leaving empty space that makes the scene feel sparse. Place your vehicle and figures on the base before you start and adjust the size. A vehicle placed at an angle to the edges, rather than parallel to them, almost always looks more natural.
Groundwork
Groundwork is the terrain: earth, mud, grass, roads, snow. It is the foundation of the scene.
- Build up the shape. Use a lightweight filler, plaster, or a ready-made texture paste to create the basic ground. Add small slopes and dips. Perfectly flat ground looks unnatural.
- Add texture. Sprinkle fine sand, small stones and gravel into the wet surface. Real earth has a variety of particle sizes.
- Seal it. Brush diluted white glue over the texture to lock it in place.
- Paint it. Base coat in a dark earth color, then dry-brush lighter shades on top. Add pigments for dust and mud.
- Add vegetation. Static grass, tufts and small bushes bring the scene to life. Keep the vegetation consistent with the season and location.
Press your vehicle into the wet groundwork to make track or tire marks. The vehicle will then sit in the terrain instead of on top of it, which makes a big difference.

Tamiya Weathering Master Set A: Sand, Light Sand, Mud
Sand and mud colors in a compact with a sponge applicator. Use them to blend the vehicle into the groundwork: rub the same mud color onto the tracks and the ground around them so the two match.
Check price on AmazonMatching scale and period
Everything in the scene should be the same scale. A 1/35 tank needs 1/35 figures and 1/35 accessories. A 1/48 vehicle needs 1/48 figures. Mixing scales is immediately visible. A 1/48 soldier next to a 1/35 tank looks like a child.
Just as important is matching the period and theater. This is where knowing the history pays off:
- German infantry figures from the 1940 French campaign should not stand next to a Panther, which entered combat in 1943.
- Soldiers in winter gear belong with a winter scene, not dusty summer groundwork.
- American infantry in Europe wore different equipment than those in the Pacific.
- Uniform details, helmets and weapons changed over the war. Check the figure set's description and compare it with your vehicle's era.

Tamiya U.S. Infantry, European Theater

Tamiya German Infantry Set, Mid-War

Tamiya German Infantry, Winter Gear

Tamiya British Infantry Patrol Set

Tamiya German Tank Crew at Rest
Telling a story
The best dioramas tell a story at a glance. You do not need a battle scene. Some of the most compelling dioramas show quiet moments:
- Maintenance: a crew working on an engine, with tools and parts scattered around.
- Refueling and resupply: soldiers passing jerry cans or loading ammunition.
- A briefing: officers gathered around a map next to a vehicle.
- A rest stop: a tank crew taking a break, smoking and eating.
- On the move: infantry walking alongside a vehicle on a road.
Figures should interact with each other and the vehicle. Look at where each figure is looking and what they are doing. If one figure is pointing, others should look where he points. If a figure is handing something over, another should be reaching for it. Arrange figures in small groups rather than evenly spread out.
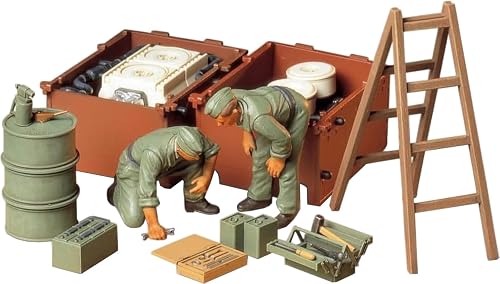
Tamiya German Tank Engine Maintenance Crew
A crew working on a tank engine is one of the classic diorama scenes. This figure set is designed around that idea, and pairs naturally with a German tank with its engine deck open. Check the listing photos to see the poses.
Check price on AmazonTamiya German Tank Crew at Rest
Figures at rest tell a different kind of story: the pause between actions. A crew relaxing on or beside their tank makes a simple, effective vignette and is easy to compose.
Check price on AmazonAccessories and details
Small details make a scene believable. Jerry cans, oil drums, ammunition boxes, sandbags, tools and personal gear fill out the scene and suggest activity. Place them where they would naturally be: fuel cans near a vehicle, sandbags in a defensive position, crates being unloaded.
Do not overcrowd. Every item should support the story. A few well-placed accessories are better than a cluttered scene.

Tamiya Oil Drums, Jerry Cans & Buckets
Oil drums, jerry cans and buckets are among the most useful accessories in any military diorama. They suit refueling scenes, depots and roadside stops, and they are easy to paint and weather.
Check price on AmazonSandbags are another versatile addition, useful for defensive positions, checkpoints and gun pits. Vehicle accessory sets add stowage that makes a tank or truck look lived-in.

Tamiya Sand Bag Set

Tamiya German Tank Accessories

Tamiya Allied Vehicle Accessories

Tamiya Diorama Set: Walls & Sandbags
Buildings and ruins
Buildings, walls and ruins add height and context. A ruined wall behind a tank instantly sets the scene in a battle-damaged town. Many brands make plastic, resin and plaster buildings in 1/35, and these are available from specialist hobby shops.
In our catalog, the 1/48 walls and sandbags set gives a simple ruined-building element for 1/48 scenes. For brick builders, sets like Jeamoc's WWII battlefield ruins and COBI's historical buildings make an entirely different kind of diorama, built from bricks and populated with block figures. Do not mix these with plastic 1/35 kits; they are different hobbies with their own scales and look. See our block set guide for more.
When using buildings, keep the composition balanced. A tall building in one corner can dominate the scene. Use it as a backdrop, not the main subject, unless the building itself is the story.
Scene ideas that match by period
These combinations from our catalog share a scale, a nation and a period, so they sit together without historical clashes. Use them as starting points, then check the box art and listing photos for poses and contents.
| Scene | Vehicle (1/35 unless noted) | Figures | Accessories |
|---|---|---|---|
| Engine repair in the field, 1943 to 1944 | Tamiya Tiger I Mid Production | German Tank Engine Maintenance Crew | German Tank Accessories |
| Refueling stop, Europe, 1944 to 1945 | Tamiya M4A3E8 Sherman Easy Eight, European Theater | U.S. Tank Crew Set, European Theater | Allied Vehicle Accessories, jerry cans and drums |
| Infantry on the road, 1944 | Tamiya Willys MB Jeep | U.S. Infantry, European Theater | Sand Bag Set for a roadside checkpoint |
| Spring 1940 in France | Tamiya Sd.Kfz.222 Armored Car | German Infantry, French Campaign | German Canister Set, Early |
| Winter on the Eastern Front | Tamiya Sd.Kfz.251/1 Ausf.D Hanomag | German Infantry, Winter Gear | Snow from a weathering compact |
| Ruined town, 1/48 | Tamiya Tiger I Late Production, 1/48 | German Infantry Set, 1/48 | Diorama Set: Walls and Sandbags, 1/48 |
Notice what each pairing avoids. The 1940 scene uses an armored car that served in the French campaign rather than a later tank. The winter scene keeps summer dust off the groundwork. The 1/48 scene stays entirely in 1/48.
A sensible order of work
- Build and paint the vehicle up to the point before final dust and mud.
- Paint the figures separately. Glue each one to a cork or an old paint bottle cap so you can hold it while painting.
- Plan the layout on the bare base with the vehicle, figures and accessories in place. Mark positions with a pencil.
- Build and paint the groundwork, pressing the vehicle into it while it is still soft.
- Weather the vehicle and ground together with the same pigments, so the mud on the tracks matches the mud on the road.
- Fix the figures. Drill a small hole in one foot and in the base, glue in a short length of thin wire, and pin the figure in place. Pinned figures survive handling far better than figures glued flat.
- Add vegetation and loose accessories last, since they are the easiest to knock off while you work.
Composition tips
- Create a focal point. The eye should go to the most important element first.
- Use triangles. Arrange elements so they form a rough triangle or pyramid. This creates a natural flow.
- Vary height. Mix standing, kneeling and seated figures. Add elevation with terrain or structures.
- Leave breathing room. Empty space around the focal point helps it stand out.
- Think about the viewing angle. Most dioramas are seen from the front and slightly above. Make sure the story reads from there.
Tip: Take a phone photo of your layout before gluing anything. Photos reveal problems with composition that your eye misses when looking directly at the scene.
For tips on scale choice, see our scale guide. For finishing the vehicle, see weathering for beginners.
Quick answers
What scale is best for dioramas?
1/35 has the widest choice of figures, accessories and buildings. 1/48 is a good alternative if you want smaller scenes or plan to include aircraft.
Do I need a big base?
No. A small base often looks better. Choose a base just large enough for your scene, and avoid large empty areas.
How do I make the vehicle look like it is part of the scene?
Press it into the wet groundwork so it leaves tracks, and use the same mud and dust colors on the vehicle and the ground.
Can I use figures from different brands?
Yes, as long as they are the same scale and fit the same period. Sizes can vary slightly between brands, so check them side by side.
Keep reading
 Techniques
How to Paint a Model Tank, Step by Step
The order of work for painting a model tank: primer, base coat, camouflage by brush or airbrush, decals, wash, dry-brushing, chipping, tracks and…
Read guide Techniques
How to Apply Model Decals Without Silvering
Make decals look painted on: gloss coat, soaking, Micro Set, Micro Sol and Mark Fit setting solutions, fixing silvering and wrinkles, and sealing the…
Read guide Techniques
Weathering for Beginners: Washes, Dust, Rust and Mud
Weathering basics: panel line washes, filters, dry-brushing, pigments, rust, mud and exhaust soot, plus how much is right for tanks, aircraft and…
Read guide